The SQL Server data platform
SQL Server has massively expanded and is no longer just a database engine but a data platform.
Following are some of the best things about SQL 2019:
- Intelligence over any data: SQL Server 2019 has gone beyond playing with relational data and can now handle structured and unstructured data, using the power of modern Big Data clusters with enhanced data virtualization (Polybase).
- Choice of language and platform: SQL Server is no longer platform-dependent and can now run on Windows, Linux, and containers. Also, SQL has in-built integration with Python, R, and so on.
- Industry-leading performance: SQL Server offers advanced scalability, performance, and availability for mission-critical, smart applications, Datawarehouse, and Data Lakes.
- Advanced security features: SQL Server has been reported as the least assailable over the last nine years in the National Institute of Standards and Technology (NIST) vulnerabilities database.
- Insights in minutes and rich reports: Use SQL Server Reporting Services in conjunction with Power BI reports producing valuable interactive reports.
With data stretching the boundaries, applications running on near real-time data, and crucial query-performance requirements, we need not just a DB engine but a smart data platform. Today, organizations must play with a broad set of data to let the business run seamlessly. They use data from different sources—from relational databases, such as SQL and ORACLE, to massive data warehouses and data marts, to Big Data. Having versatile data sources can be challenging as each data source has a different architecture, storage mechanism resulting in the need to have various skillsets and specialty expertise.
A unified data platform
SQL Server 2019 brings all this under one cover in the form of a unified data platform. SQL Server 2019 yields a more enriched SQL DB engine, provides scalability with built-in support for Big Data (Apache Spark, Data Lake), grants data virtualization technology, and offers built-in machine learning, Python, and R capabilities.
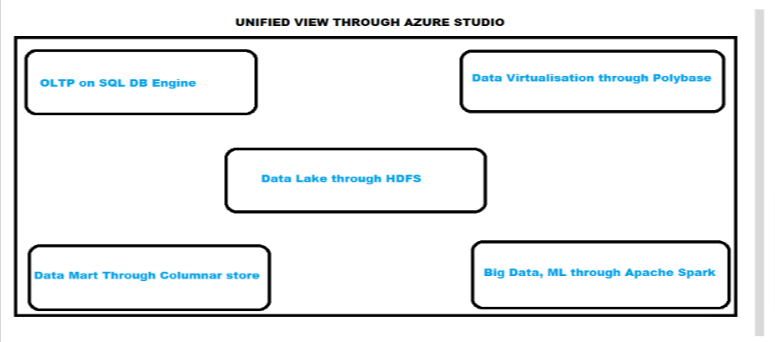
SQL Server 2019 presents a unified data platform by using:
- SQL DB Engine for OLTP
- Data virtualization through Polybase
- Data Mart through columnar store
- Data Lake through HDFS
- Big Data, ML, streaming through Apache Spark
Another critical part is the management and monitoring of these inter-related pieces. We can achieve this by using command-line tools, APIs, portals, and Dynamic Management Views (DMV). Microsoft also provides us with Azure Data Studio (ADS), which gives us a unified view. Azure Data Studio offers a modern editor experience with IntelliSense, code snippets, source control integration, an integrated terminal, built-in charting of query result sets, and customizable dashboards.
With SQL Server 2019 at hand, organizations can use not just the SQL relational DB engine but also a tremendous volume of Big Data on a centralized, scalable platform. Furthermore, by using PolyBase to virtualize the data stores, form data lakes, build scalable data marts and SQL Server 2019, and use Big Data clusters to produce intelligent applications, any organization can become more successful.
In this article, we will dig deep into how to achieve data virtualization through PolyBase.
Introduction
With data being omnipresent, we continuously face challenges to move or copy it to another location to process it further. With a small data set, this is easy enough, but it can be a problem with ever-increasing data sizes. Also, with the progressive augmentation of data mining by organizations, data leaders do not advocate keeping data in one place. Likewise, it can be tedious to fetch or use data from different data stores of structured and unstructured data and Big Data.
Data virtualization is the solution to this problem.
What is data virtualization?
Data virtualization is an approach to data management that enables an application to retrieve and manipulate data without requiring technical details about the data, such as how it is formatted at the source or physically located. It can provide a single customer view of the overall data.
There are a lot of Data Virtualization tools present in the market, such as the following tools:
- Microsoft Polybase
- Actifio Virtual Data Pipe (VDP)
- Informatica Powercenter
- IBM Cloud Pak for Data
- RedHat JBoss Data Virtualization
For this article, we will focus on PolyBase, which Microsoft introduced in SQL 2016 and has improved with each subsequent SQL version.
Polybase enables SQL Server to run Transact-SQL queries on external data sources like Azure Blob, Hadoop, Oracle, MongoDB, and so on. The same Transact-SQL used to process external data can also run on relational databases. This ability helps to integrate data from external sources with relational data in your database. The following image shows a simple illustration of SQL Polybase:
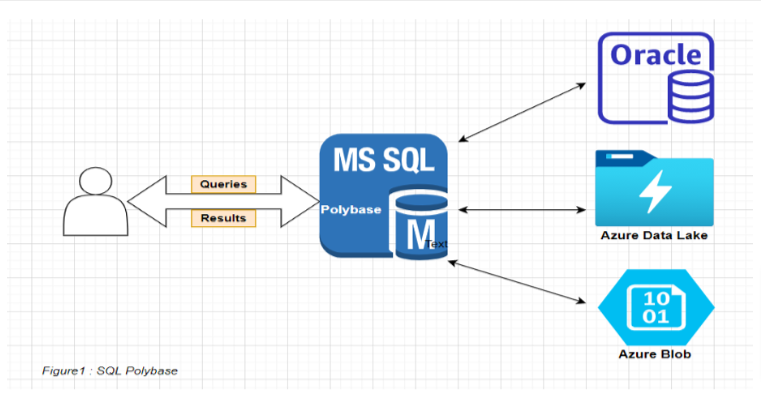
Now that we know the basics of Polybase, Lets do a demo that fetches data from an Azure blob external source by using SQL PolyBase.
Demo prerequisites
- Install SQL 2016 or later with the PolyBase feature.
- Enable PolyBase on SQL Server.
- Create an Azure Storage account.
- Create an Azure blob container.
- Place a data file in the blob container.
- INSTALL SQL POLYBASE
You can install Polybase with only one SQL instance on a machine.
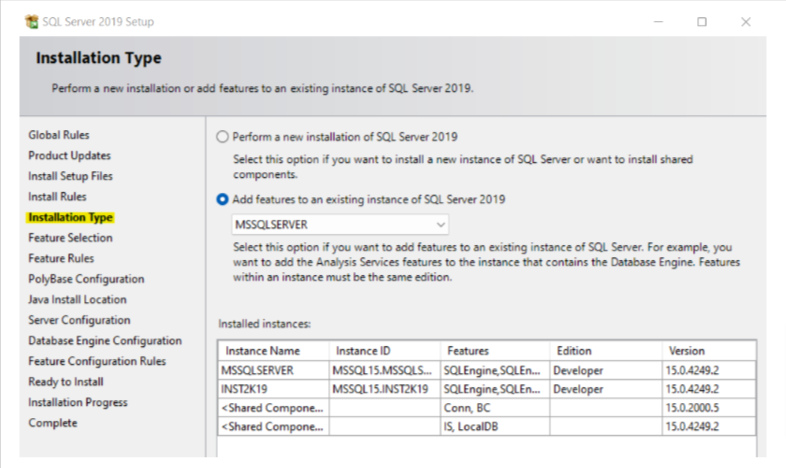
1. Click Installation in the sidebar and select New SQL Server Stand-alone installation or add features to an existing installation.

2. After you reach the Installation Type window, select Add features to an existing instance, and select the required instance from the drop-down menu.
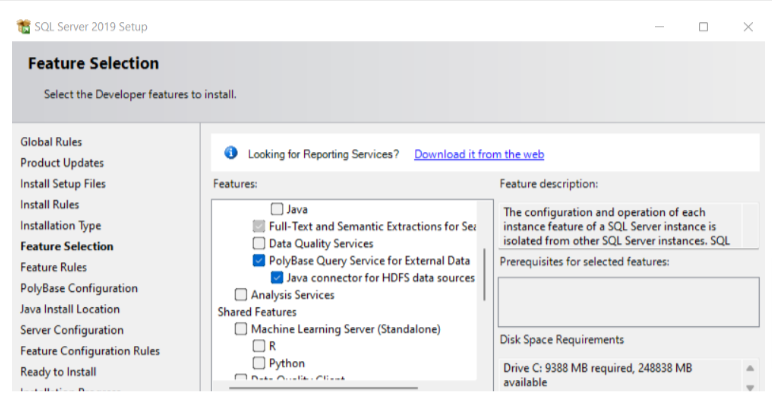
3. After you reach the Feature Selection window, select the PolyBase features.
4. In the Polybase Configuration window, select Use this SQL Server as standalone Polybase-enabled instance.

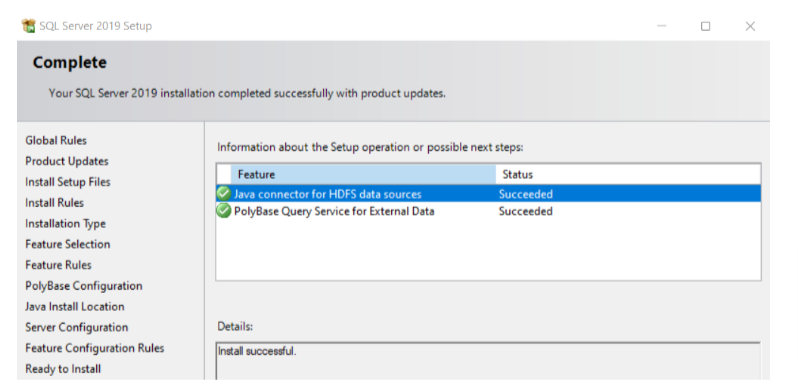
5. For the rest of the sidebar options, select the defaults and click Install. After the installation completes, the following window displays:
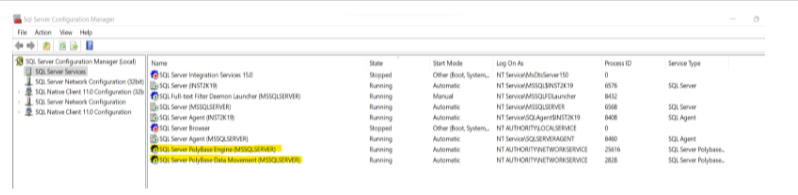
At this point, we can see in the SQL configuration manager that we have two more features installed. However, we might still get the error message Polybase not installed in SSMS while trying to enable Polybase. To fix this, restart the server after installing Polybase.
- ENABLE SQL POLYBASE
To enable PolyBase, run the following steps:
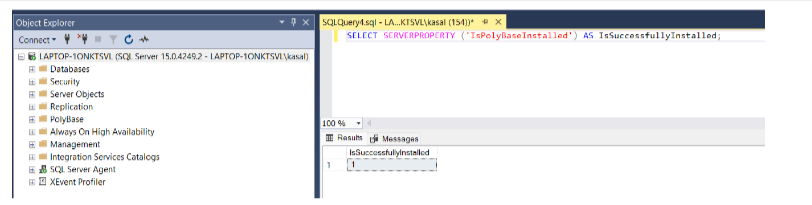
- Connect to SQL Server in SSMS and run the following query to confirm that Polybase installed successfully.
SELECT SERVERPROPERTY (‘IsPolyBaseInstalled’) AS IsSuccessfullyInstalled;
The following image shows the output of a successful installation:
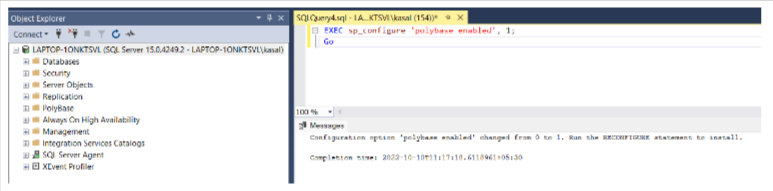
- Enable Polybase by running the following queries:
EXEC sp_configure ‘polybase enabled’, 1;
Go
Reconfigure
- CREATE AN AZURE STORAGE ACCOUNT
Perform the following steps to create an Azure Storage account:
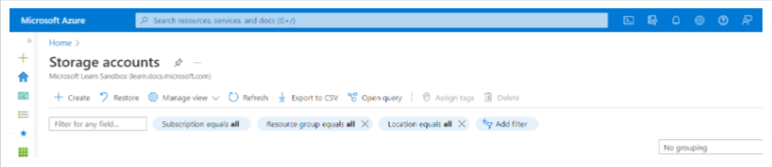
- Log in to the Azure Portal by using credentials.
- On the Azure Portal search bar, type Azure Storage account and click + Create to create a new storage account.
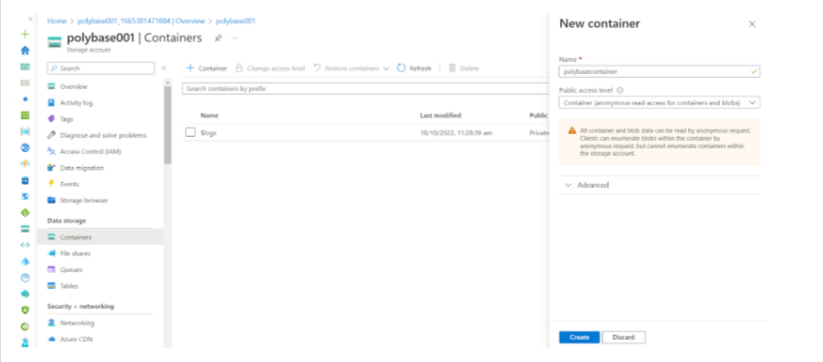
- CREATE AN AZURE CONTAINER
To create an Azure container, go to the created Azure storage account, click on Containers in the left pane, and then click on +Container.
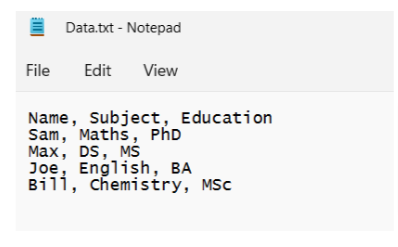
PLACE A DATA FILE IN THE CONTAINER
At this stage, create a text data file and upload it to the container.
- Create a text file similar to the following file:
Note: We can also use CSV, Excel, or other external data sources. However, depending on the external data source, we need to take a few additional steps. For example, for CSV or Excel data sources, we should install proper drivers on the SQL Server and add the connection properties to an ODBC data source name (DSN). we can use the Microsoft ODBC Data Source Administrator to create and configure ODBC DSNs.
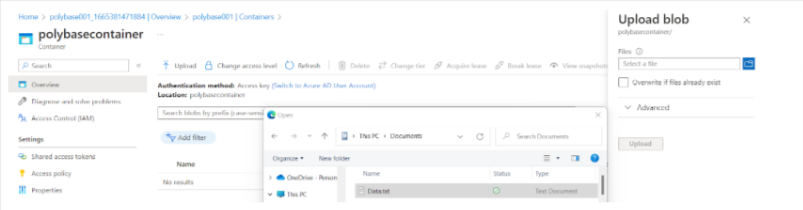
- Go to the container you created, polybasecontainer, click Upload, click the folder icon on the right,-hand side, and select the file to upload.
Steps to set up SQL Polybase to fetch data from Azure blob
- SET UP SQL SERVER TO ACCESS THE EXTERNAL TEXT FILE PLACED ON THE BLOB
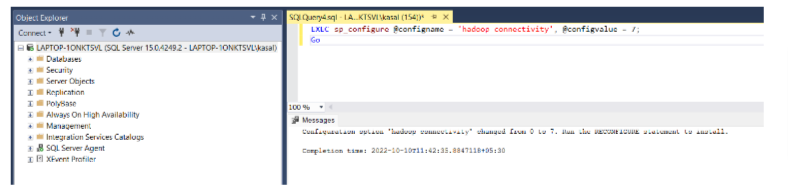
To allow SQL Server to access the external text file placed on the Azure blob, run the following query:
EXEC sp_configure @configname = ‘hadoop connectivity’, @configvalue = 7;
Go
RECONFIGURE
- SET UP SQL SERVER DATABASE, DATABASE MASTER KEY, AND CREDENTIALS
Now, we need to either use an existing database or create a new one. I created a new one named PolybaseTestDB.
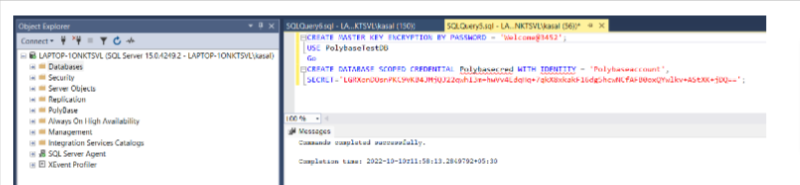
After DB creation, create a database master key and credentials by using the following query:
CREATE MASTER KEY ENCRYPTION BY PASSWORD = ‘XXXXXXX’;
USE PolybaseTestDB
Go
CREATE DATABASE SCOPED CREDENTIAL [Polybasecred]
WITH
IDENTITY = ‘Polybaseaccount’,
SECRET=’XXXXXXX’;
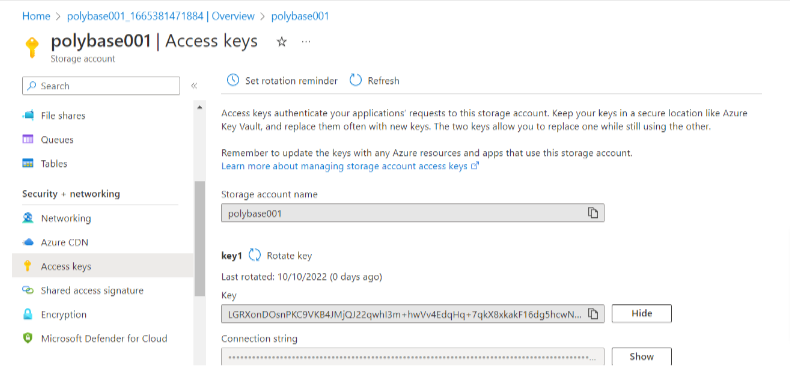
In the preceding query, SECRET is the access key of the storage account we created previously. We can get it by performing the following steps:
- Go to Azure Portal -> Storage Accounts.
- Click on your storage account.
- In the left-hand pane, select Access Key.
- The keys display on the right-hand pane.
- Copy and use them in the preceding query.
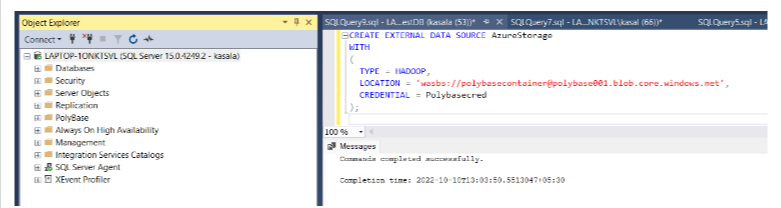
3. CREATE AN EXTERNAL DATA SOURCE BY USING THE CREDENTIALS YOU CREATED
Run the following query to create the external data source. After we create it, we can find the external data source under the DB external resources.
CREATE EXTERNAL DATA SOURCE AzureStorage
WITH
(
TYPE = HADOOP,
LOCATION = ‘wasbs://polybasecontainer@ polybase001.blob.core.windows.net’,
CREDENTIAL = [Polybasecred]
);
Note: The Azure Storage Blob is an extension built on top of the Hadoop Distributed File System (HDFS) APIs, so the TYPE in the preceding query is Hadoop.
4. CREATE AN EXTERNAL FILE FORMAT
Run the following query:
CREATE EXTERNAL FILE FORMAT TextFileFormat WITH (
FORMAT_TYPE = DELIMITEDTEXT,
FORMAT_OPTIONS (FIELD_TERMINATOR =’,’,USE_TYPE_DEFAULT = TRUE))
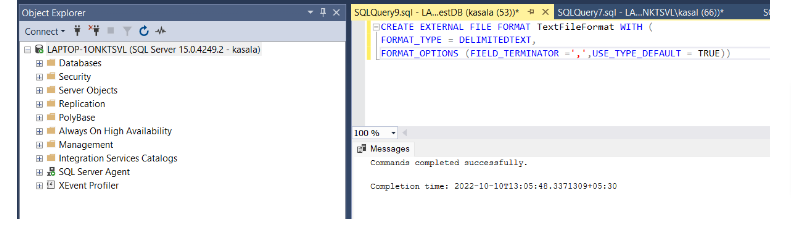
Note: Because it’s a comma-separated text file, the FIELD_TERMINATOR is ‘,’.
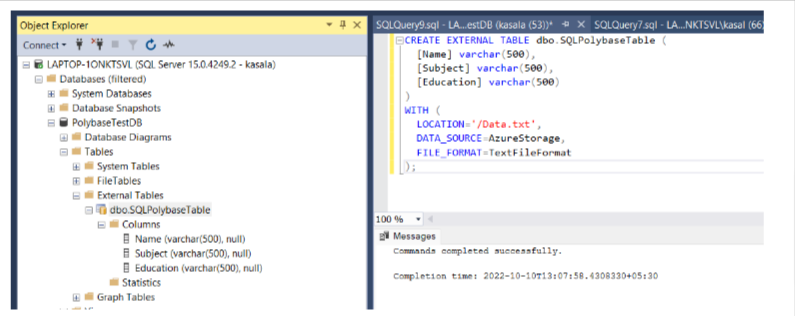
5. CREATE AN EXTERNAL TABLE
Run the following query:
CREATE EXTERNAL TABLE dbo.SQLPolybaseTable (
[Name] varchar(500),
[Subject] varchar(500),
[Education] varchar(500)
)
WITH (
LOCATION=’/Data.txt’, This is the name of the file uploaded to the container.
DATA_SOURCE=AzureStorage, The Data Source created in previous steps.
FILE_FORMAT=TextFileFormat The File Format Name created in previous steps.
);
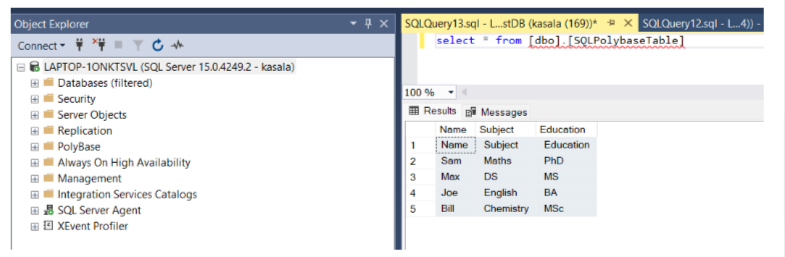
6. QUERY THE EXTERNAL TABLE
Query the external table as we would any other table on SQL Server. The results validate that PolyBase helps us to fetch external data. Run the following query:
Select * from <Tablename>